[Update] Someone going under the name ‘longhorn’ just posted a comment that the method described here is dangerous and has led to problems with his image. And although I have used this myself with no problems so far, I do believe that it’s better to be safe than sorry. Apparently, there is a better tool to manage vmware images, called diskTool (typically found under /Applications/VMware Fusion.app/Contents/MacOS). A quick test to grow an image failed with a malloc error, but I will look into this and update this post. And the golden rule to always make a backup before you try stuff like this, still applies of course (I *do* mention this in the post)…
I’m probably not the only VMware user who has underestimated the amount of disk space he needs, only to find out a couple of months later, that the disk is filling up faster than expected. Fortunately, this is (relatively) easy to fix. That is, if you have enough ‘real’ HD space of course!
Warning: always backup your data before doing things like changing partitions etc…!
First, download a copy of vdiskmanager-GUI (oh, I forgot to mention: I will explain how to do this on a Mac). I could only find it here (technically speaking you don’t need this, as it is just a wrapper around the VMware provided vmware-vdiskmanager command-line tool). Open this tool, and select the ‘Expand’ tab. Choose the vmdk (virtual disk image) you want to expand, and enter its desired size (6Gb in my case):

If you click ‘Go’, the vmdk file will expand to the desired size.
For those of you that don’t have a mac: you really should 🙂 No, you can easily accomplish the same thing: on the bottom of the screen you can see the command that will be executed if you click ‘Go’. So just locate vmware-vdiskmanager (it is probably somewhere in your c:\program files\vmware directory, and run it with -x <desired size> <path_to_vmdk>. This should do the trick. Or even better, just download the VMware-diskmanager GUI for PC here.
When you reboot the VM, you might be surprised to see that you hard disk in your guest OS (say, Windows XP in this case), is still at its original size! Although it might sound confusing, it is actually perfectly logical, as we haven’t changed the partition, we only changed the ‘hard disk’ the partition is residing on. One way of ‘fixing’ this is doing a complete reinstall of the system, thereby repartitioning the disk. Although it works, it’s certainly not something most of us will look forward to (as it erases all of your current apps and data).
Luckily for us, there is a much simpler way. Just download a copy of a gparted live-cd (ie a cd that is bootable). gparted is the Gnome Partition Editor, which is a linux tool to, you probably guessed it, edit partitions. Although it is linux tool, it does support ntfs, which should be the Windows filesystem you’re using (a list of the supported filesystems). And even better: since it is a live-cd, you don’t even have to install anything. Just download the iso file, and connect the CD player of your VM to this ISO:

Now the tricky part: in order to run gparted, you have to start your VM, but force it to boot from this CD instead of your HD. The traditional way of doing this, is to press F2 to enter the BIOS setup. However, under VMware, this is a trail-and-error process, as you have to be really fast to press F2 or it will just boot from the HD.
Fortunately, there is a work-around. In your .vmx file, just add
bios.forceSetupOnce = “TRUE”
This forces VMware to enter the BIOS setup on the next boot (this setting is automatically set to FALSE). In the BIOS, make sure that your CD drive is above your hard drive, exit the BIOS and restart the VM.
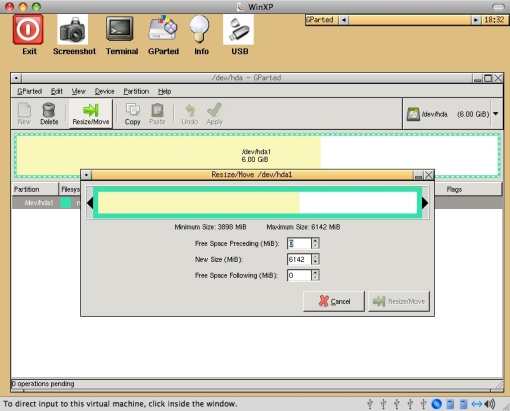
Now you should see linux booting, and gparted will automatically start-up (I selected the default setting on the first list, then just pick your keyboard and language settings from the list).
If the disk you want to expand, is not already selected, use the drop-down to select it. Then, click ‘Resize/Move’ and either visually resize the partition, or just enter its new size:
Close the dialog (‘Resize/Move’) and click ‘Apply’ to actually perform the partition change. After this is done, exit gparted and disconnect the iso from the CD. If necessary, change the boot order in the BIOS setup, and restart into your guest OS. In Windows, this will typically bring up the chkdsk utility. This will check your partition (which is probably a good thing). After that is done: you can start to use that newly added disk space!

January 2, 2008 at 10:39 pm
Great thoughts. I’m worried this is a bit out of my wheelhouse of skills.
Do you know how I might find someone to do this for me in Seattle?
I’d really appreciate any recommendations you have.
thanks
John
January 3, 2008 at 6:52 pm
When I try to expand the disk I get an error message about not being able to “access the geometry”.
Does the disk have to be a single file? My disk is in 2gb segments.
I was able to use the GUI utility to defragment the disk.
I read that a disk cannot be expanded that contains a snapshot so I removed the snapshot and I still get the error message about not being able to “access the geometry”.
What am I doing wrong.
March 18, 2008 at 8:29 am
Hi.. im trying to resize virtual disk for linux VM(ubuntu to be precise). I tried using the command line(same command suggested for everything else-sudo /Library/Application\ Support/VMware\ Fusion/vmware-vdiskmanager -x [newsize] path_to_virtual_disk.vmdk)
and it seems to be working expanding the disk.. but it when i start up the vm it doesnt know how to find the disk.. anybody know how to get around it/fix this??
April 10, 2008 at 11:00 pm
Hello. Sorry if I posted in the wrong section, but here’s my question.
I’ve been running Windows XP Professional using VMWare Fusion for my macbook with Leopard. I have just tried to start up virtual pc and as it boots up the terminal window, it stops with the message:
A disk read error occurred
Press Ctrl+Alt+Del to restart
Since I did not know how to press that in mac keyboard, i connected the external usb keyboard and tried, but the same message appears. So anyone know how to fix this problem? Please help. Thanks in advance.
john
April 20, 2008 at 7:59 am
Hi,
I am experiencing the same problem as John. Wondering if anyone has a solution for this? I got important files in the my windows xp virtual machine, which i am trying to back up. Any help would be appreciated! thanks
May 7, 2008 at 7:49 pm
DO NOT use this method. Use /Applications/VMWare\ Fusion/VMWare\ Fusion.app/Contents/MacOS/diskTool instead. I also found out the hard way and had to restore from a backup. Stevend, perhaps it’s time to update this post with some correct info.
June 25, 2008 at 6:13 pm
i have an issue where my macbook air SDD (55gb useable) is almost full and i’ve only had it 3 months. I have fusion running with a 20GB XP vm. I’d liek to drop this down to about 12GB so i can even keep the ship afloat. :0 any thoughts for moving and reducing the size of the XP vm? any thoughts?
June 27, 2008 at 1:12 pm
Just wanted to say a HUGE THANK YOU for this GUI. Amazing that it’s not a part of VM Ware but I really appreciate it when programers help out the rest of us.
Thank you!
Mick
July 8, 2008 at 7:21 am
Just a quick “thank you” for this superb guide. 🙂
August 4, 2008 at 4:07 pm
[…] https://onlytalkingsense.wordpress.com/2007/12/27/vmware-fusion-expanding-a-disk-2/ […]
August 8, 2008 at 11:16 am
Mick G, just for the record, I didn’t write any of these applications myself, I just wrote this guide 🙂
August 10, 2008 at 4:28 pm
i have an issue with my macbook (80gb ) . I have fusion running with a 30GB(assigned at d time of installation) UBUNTU 8.04 vm. I’d like to shrink(i’ve already disgarded previous snapshoot so i’ve only one current snapshoot) because SYSTEM MONITER in UBUNTU’s vm disk is showing total used space about 6 gb but it have size on real disk around 14 gb.As i know to shrink a XP vm image (i’ve done it manually using JKDEFRAG for deferagmentation and for deleting free space using SDELETE from guest os and then shrinking it using vmware diskTool from host os using terminal ) any thoughts for shrinking it….pls thanks in advance…
August 11, 2008 at 8:23 am
[…] VMWare Fusion Expanding a Disk – A Well written guide with screen captures. It apparently was written before VMWare Fusion 2.0 so doesn’t mention that VMF2 has built in resizing. No need to download a tool or use command line. Just delete your snapshots and resize the disk. After that the real fun begins. […]
August 15, 2008 at 9:13 pm
Great guide – worked like a charm. Thanks for putting this online…
August 28, 2008 at 2:22 am
Thanks for the guide .. my 10GB image was filled up quite fast, so expanding the image to bigger size .. your guide has saved me from reinstallation.
September 12, 2008 at 5:08 pm
I used diskTool (/Applications/VMWare\ Fusion/VMWare\ Fusion.app/Contents/MacOS/diskTool) and it worked very well, along with geparted.
I guess if I had read the comments first, I would have used the built-in tool. But nothing wrong with re-familiarizing myself with the command line! Thanks for the guide!
September 18, 2008 at 12:37 am
I just did this with Fusion 2.0
Make sure you have shut down the Windows VM cleanly before running gparted. Also the comments about “not using this tool” don’t refer to gparted.
September 23, 2008 at 9:39 am
Hey
I’ve expanded my disk using Fusion 2.0. Fine… but windows still only sees the orginal (very cramped) amount!
I’m not a big windows user… do I need a partition tool to expand the partition?
Thanks
K
September 25, 2008 at 9:44 am
A word of warning: don’t cut and paste this from above:
bios.forceSetupOnce = “TRUE”
into your file. The quotes end up wrong. You need to retype the quotes to get VMWare to recognise them.
October 1, 2008 at 11:09 am
[…] howtogeek e Only talking sense Questo post è stato scritto da antonde e pubblicato il Ottobre 1, 2008 alle 11:08 am in […]
November 1, 2008 at 3:05 pm
ditto to karl
November 5, 2008 at 4:21 pm
“Fortunately, there is a work-around. In your .vmx file, just add
bios.forceSetupOnce = “TRUE””
this lacks the explanation what is vmx file and how to find it and how to edit it. i’ve spent an hour looking for a file like that on both my mac and the virtual windows machine with the only success that for the first time i experienced the finder crashing when added too many search variables
November 20, 2008 at 11:02 am
[…] VMware Fusion – Expanding a disk « Only Talking Sense (tags: vmware) […]
November 20, 2008 at 10:45 pm
the vmx file is located in the *.vmwarevm package. Locate the vm images ( mine were in ~/Documents/Virtual Machines/ ) control-click on the *.vmwarevm you want to edit and choose “Show Package Contents” if you are using the finder. If your are Editing the vmx file be shure to use a plaintext editor (like TextWrangler) and not TextEdit.
Otherwise open terminal and cd into your vmwarevm (is a directory) and edit your .vmx
January 15, 2009 at 9:55 am
Worked perfectly to the t. Thanks.
June 5, 2009 at 1:14 pm
Sorry if this has already been answered – it doesn’t seem to have been – Although my virtual drive shows up in the VMWare settings as 35 Gig, when I look at the C: drive in Windows, it shows only a 20 gig capacity. I’m getting near to that limit, but can’t find a way to retrieve my missing 15 gig. Worse still, because I (stupidly) ticked “pre-allocate disk space”, the Mac OS can’t have this 15gig either – so VMWare is effectively holding this 15 gig hostage and won’t let either OS have it! Can anybody help? Thanks! Ben
June 5, 2009 at 5:03 pm
That is exactly what has been post, after you resize your disk, but your partition remains the same size. Remember that your OS is only able to access up to the partition size.
So the steps shown here is basically resizing the OS partition to the full size of the disk.
June 18, 2009 at 8:07 am
Thanks, this was really helpful. 🙂
June 24, 2009 at 1:48 pm
Great guide! In Fusion 2.0.5 the hard drive can be resized in the settings dialog. There is no need for the vdiskmanager anymore.
The gparted part has to be done though.
September 27, 2009 at 6:30 pm
Everything working fine!
Only was problem with touch-pad (I’m on Macbook)
Gparted does not support it. Very difficult to make everything with TAB and arrow keys. Shut down only trough VMware menu self!
December 13, 2009 at 6:14 pm
Thanks! I couldn’t figure out how to resize the boot partition. gparted was just what I was looking for. I thought I was going to have to create a new virtual machine and reinstall everything, so you saved me a huge amount of frustration!
January 15, 2010 at 7:14 am
Before you begin, create a backup copy of the Fusion virtual disk so that you can restore it in case of failures. Extending a virtual disk can be a complex operations for several reasons, e.g.,:
1) The virtual disk that is full happens to contain the boot/primary partition for Windows
2) There are snapshots
3) There is insufficient disk space available on the physical drive to permit growth
4) It is a multi step process and involves use of different tools and commands in a specific sequence. Creative individuals have devised workarounds to extend the primary partition for Windows by using Linux boot disks and disk partitioning tools such as GParted, and you have to get this right.
You’ll find several posts regarding this topic on Google. Essentially, they are all variations of the posts summarized in
http://blog.sharevm.com/2010/01/11/survey-extend-expand-vmware-virtual-disk/
February 4, 2010 at 6:50 am
You should download and try fatVM http://www.gudgud.com/fatvm
fatVM is a reliable, robust, and safe, 1-click solution for extending the C drive of your VMware Fusion or Workstation virtual disk that is becoming full.
* It provides a simple, intuitive, interface and a reliable process that hides the technical complexity of extending a virtual disk.
* It is robust because it can extend virtual disks having snapshots and clones.
* It is safe because it preserves your original disk, which remains available to you for when the need ever arises.
December 15, 2010 at 9:33 am
turns out you don’t need to do this anymore on windows 7 … it allows resizing (only increasing) the boot partition without the gparted work
February 17, 2011 at 3:31 pm
Thanks for taking the time to post – this saved me a lot of time.
January 25, 2011 at 8:47 pm
‘;. I am very thankful to this topic because it really gives great information .,*
July 4, 2011 at 11:52 am
autumn coloring sheets,
March 22, 2012 at 11:44 pm
Learn Music Instruments…
[…]VMware Fusion – Expanding a disk « Only Talking Sense[…]…